Coreboot on HP Elitebook 8460p
My experience in getting the free and open source BIOS running on my slightly outdated but still much beloved laptop.
Hardware for flashing
Even though I found evidence that the flash chip can be read and even written from a running machine, that didn’t work out for me.
Instead I had great success using a Bus pirate. I didn’t even need a second PC as my Pocket - Chip made an excellent platform for flashing, hacking and even recovering to a stock firmware if nothing would work at all. Shame that company went bancrupt.
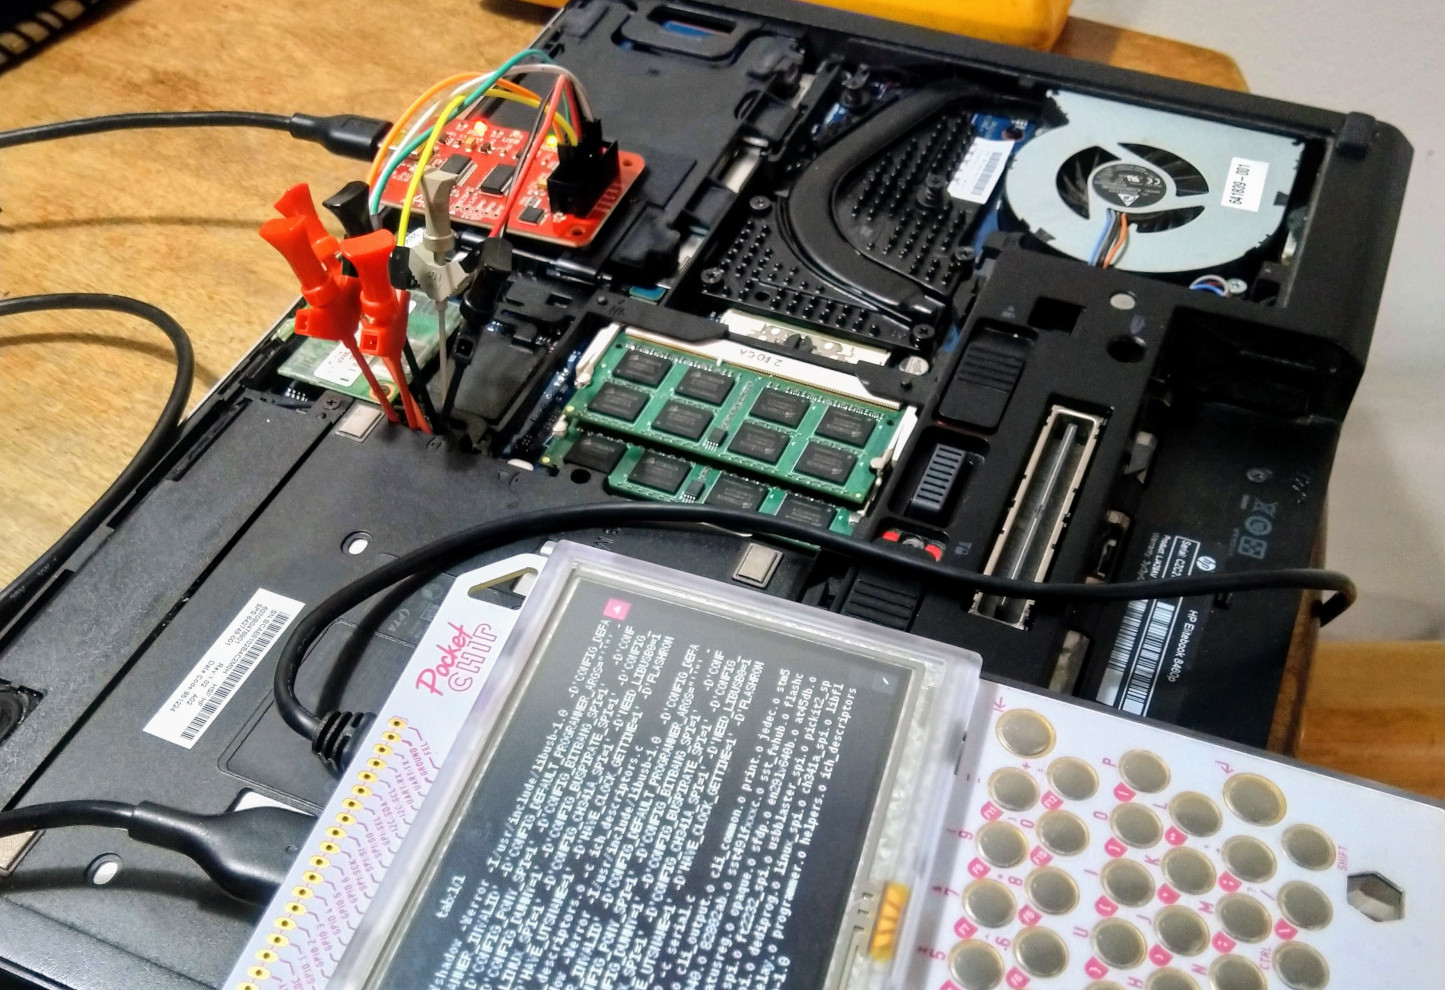
These really useful little clips are available on Aliexpress / eBay.
Note that reading / writing the flash in-circuit like this is tricky and dangerous.

Here is how I wired it up. The MISO and MOSI lines on the Bus Pirate directly attach to pin 2 and 5 of the flash chip. The SS line connects to pin 1. I also connect pin 8 to the 3.3 V supply of the Bus Pirate and pin 4 to GND.
!!! double check that there are no shorts from 3.3 V to GND before going ahead !!!
On my first try I noticed that the Bus Pirates 3.3 V supply was pulled down to < 1.7 V when I enabled it. This is a power sequencing problem. I found a workaround which involves powering up the notebook. Be super careful when doing this.
- While the Bus Pirate is attached, insert the laptop battery or power cord. This will provide power to the flash chip for ~10 seconds
- Within these 10 seconds, start the read / write operation with
flashrom. Once started, the 3.3 V supply of the Bus Pirate will supply the flash chip - After the Bus Pirate power supply is enabled (watch the LED), the laptop battery or power cord can be unplugged
Here’s the command I used for reading out the stock bios
flashrom --programmer buspirate_spi:dev=/dev/ttyUSB0,spispeed=2M -r rom1.rom
I’ve done that 4 times, then I made sure all 4 binary files are equal (diff rom1.rom rom2.rom …).
Here’s the command I used for flashing
flashrom --programmer buspirate_spi:dev=/dev/ttyUSB0,spispeed=2M -w coreboot.rom
Extracting binary blobs
There’s several binary blobs which need to be extracted from the original bios image. Here’s how to do it …
Embedded controller
The kbc1126 is a 8051 based microcontroller dealing with keyboard, LEDs, temperature sensors, fan-speed, battery charging, standby mode and various other things needing GPIOs.
Coreboot includes a tool to extract the two required firmware images from the flash dump.
cd {COREBOOT_DIR}/util/kbc1126/
make
./kbc1126_ec_dump rom1.rom
 mv rom1.rom.fw1 ${COREBOOT_DIR}/fw1.bin
 mv rom1.rom.fw2 ${COREBOOT_DIR}/fw2.bin
The files need to be added during make menuconfig under Chipset
Intel me, gbe
Firmware blobs for Gigabit ethernet and the Intel management engine. Extracted from flash dump with ifdtool
cd {COREBOOT_DIR}/util/ifdtool/
make
./ifdtool -x rom1.rom
mv flashregion_0_flashdescriptor.bin ${COREBOOT_DIR}/descriptor.bin
mv flashregion_2_intel_me.bin ${COREBOOT_DIR}/me.bin
mv flashregion_3_gbe.bin ${COREBOOT_DIR}/gbe.bin
Add these files to make menuconfig under Chipset.
There are options to verify the intel_me image and also to strip it down. They both worked well for me. This removes everything from the firmware blob which is not necesarry for initialization, including all unneeded (and untrusted!) functionality of the IME.
VGA option rom
At this point I was able to boot linux and ssh into my machine. However the screen was black, no graphics, not even backlight. I had to revert to stock bios and follow the steps below to extract the bios of the Radeon video card
sudo echo 1 > /sys/devices/pci0000:00/0000:00:01.0/rom
sudo cp /sys/devices/pci0000:00/0000:00:01.0/rom {COREBOOT_DIR}/pci1002,6760.rom
Add the file to make menuconfig and enter the PCI vendor and device IDs
VGA BIOS  --->
    [*] Add a VGA BIOS image
    (pci1002,6760.rom) VGA BIOS path and filename
    (1002,6760) VGA device PCI IDs
I had to disable libgfxinit and rely on vgabios to initialize the graphics. Also I’m using VGA text mode, the graphical framebuffer didn’t work.
Payloads
I’m using the SeaBIOS payload. I’ve also added all secondary payloads. They work just fine. SeaBios boots into Grub2 on disk.
Issues and workarounds
-
Windows 10 gets stuck in a blue-screen during boot and fails with an
ACPI_ERROR. I fixed the problem by deleting my windows partition :D -
Debain logs show errors related to a non responding Intel management engine. That’s actually not an error but a feature. Got rid of the error by adding the following to
/etc/modprobe.d/blacklist.conf
  blacklist mei
  blacklist mei_me